Samsung Smart TV Wi-Fi Problems
What happened?
I purchased a 48 inch LED Samsung Smart TV UN48H6350AFXZA on November of 2014 right around the black Friday deals. I really wanted a smart TV as I was planning on only using it with online streaming services such as Netflix, Hulu Plus, and Amazon Prime Videos. I also have a local Plex Media Server that runs on my FreeBSD home server so I also wanted to be able to install the Plex app on my TV and stream it straight from the server without the need to use any additional device such as Chromecast.
The TV was working perfectly fine until a few weeks ago when I started getting occasional “Network error” when streaming movies using the Plex app. First I thought I had some issues with my Wireless router and didn’t pay much attention and restarted the TV. Things were fine but I kept getting the “Network error” message and the video will stop playing from time to time. I tried restarting the Wireless router and the Modem but no luck. I even tried resetting the TV to factory defaults. Nothing changed. After a few days, I couldn’t even connect to Wireless networks. I thought the Wi-Fi module in the TV stopped working and tried to use the Ethernet cable. Things were working fine for a few days and then it started acting up again. Finally, the TV would sometime freeze (i.e) not respond to any key strokes from the remove or the hardware jog control. Sometimes it will even reboot itself.
Samsung Cusomer Service
My TV came with just one year warranty and I didn’t purchase any extended warranty because I didn’t think I will need it but I was really disappointed when this problem happened. Since the TV was purchased over a year ago, I wasn’t sure if contacting the Customer Service was going to be any helpful but I contacted them anyway. I was on the chat with the customer services representative for hours and he asked me to try a lot of diagnostic steps which I had already done. They finally said the TV needs to be repaired and recommended a service center close to me.
So I called the service center and explained them all the symptoms and they said it would require changing the motherboard of the TV and that would cost about $400. I purchased the TV for only $600 and I wasn’t comfortable spending $400 just for getting it fixed.
Discover Extended Warranty
I made the purchase of the TV using my Discover card and one of the card benefits is Extended Product Warranty. So I decided to call Discover customer service to see if they would cover the cost for the repair. They got all the details from me regarding the TV and the problem, gave me a claim number and asked me to wait for a call from them.
The Adventure
I didn’t want to wait for them and tried to figure it out myself. These are the facts so far:
- The TV started having trouble with Wi-Fi connectivity.
- The TV failed to connect to Wi-Fi networks.
- I use the Wi-Fi connection extensively.
I found out about the hidden service in the Samsung Smart TVs. It can be activated by the following steps:
- Power the TV off.
- Press Info + Menu + Mute + Power simultaneously.
- Press the following keys in the order: Mute > 1 > 8 > 2 > Power
The TV will now power on and the service menu will show up. The service menu has a lot of options we can tweak. I didn’t want to touch anything that I wasn’t sure about. There is a menu to perform diagnostic tests on various components/module on the TV under the SVC option.
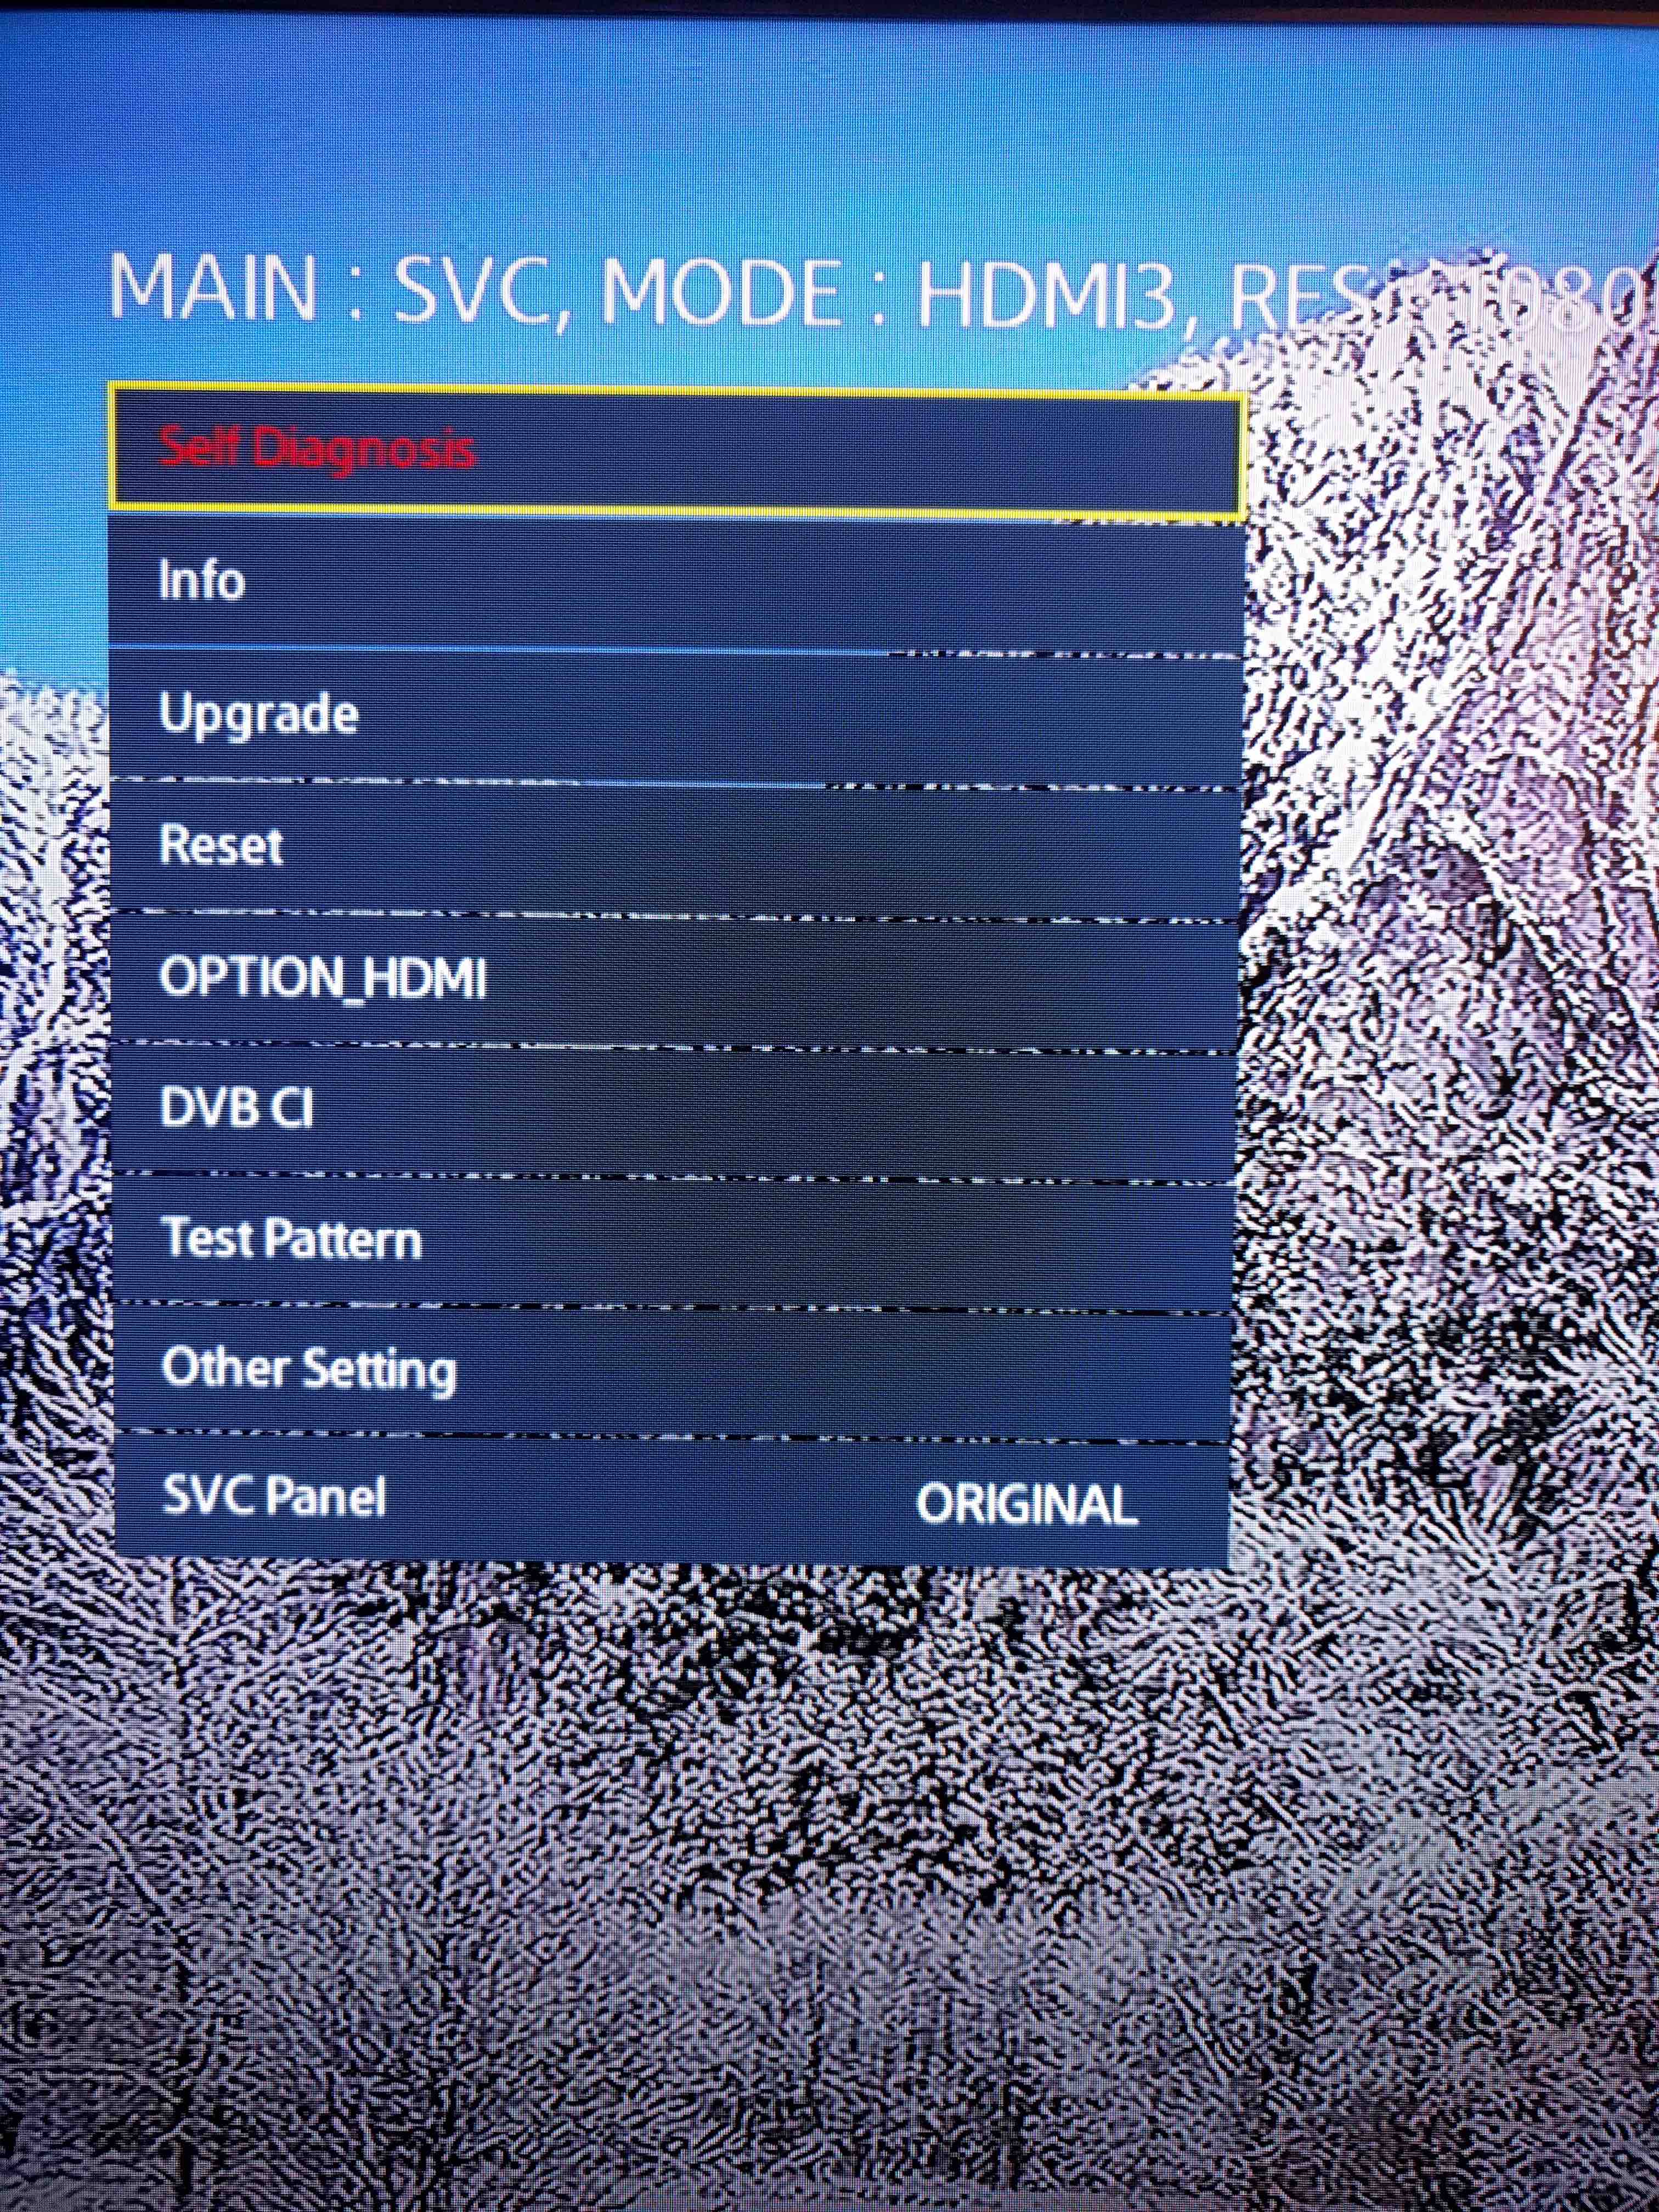
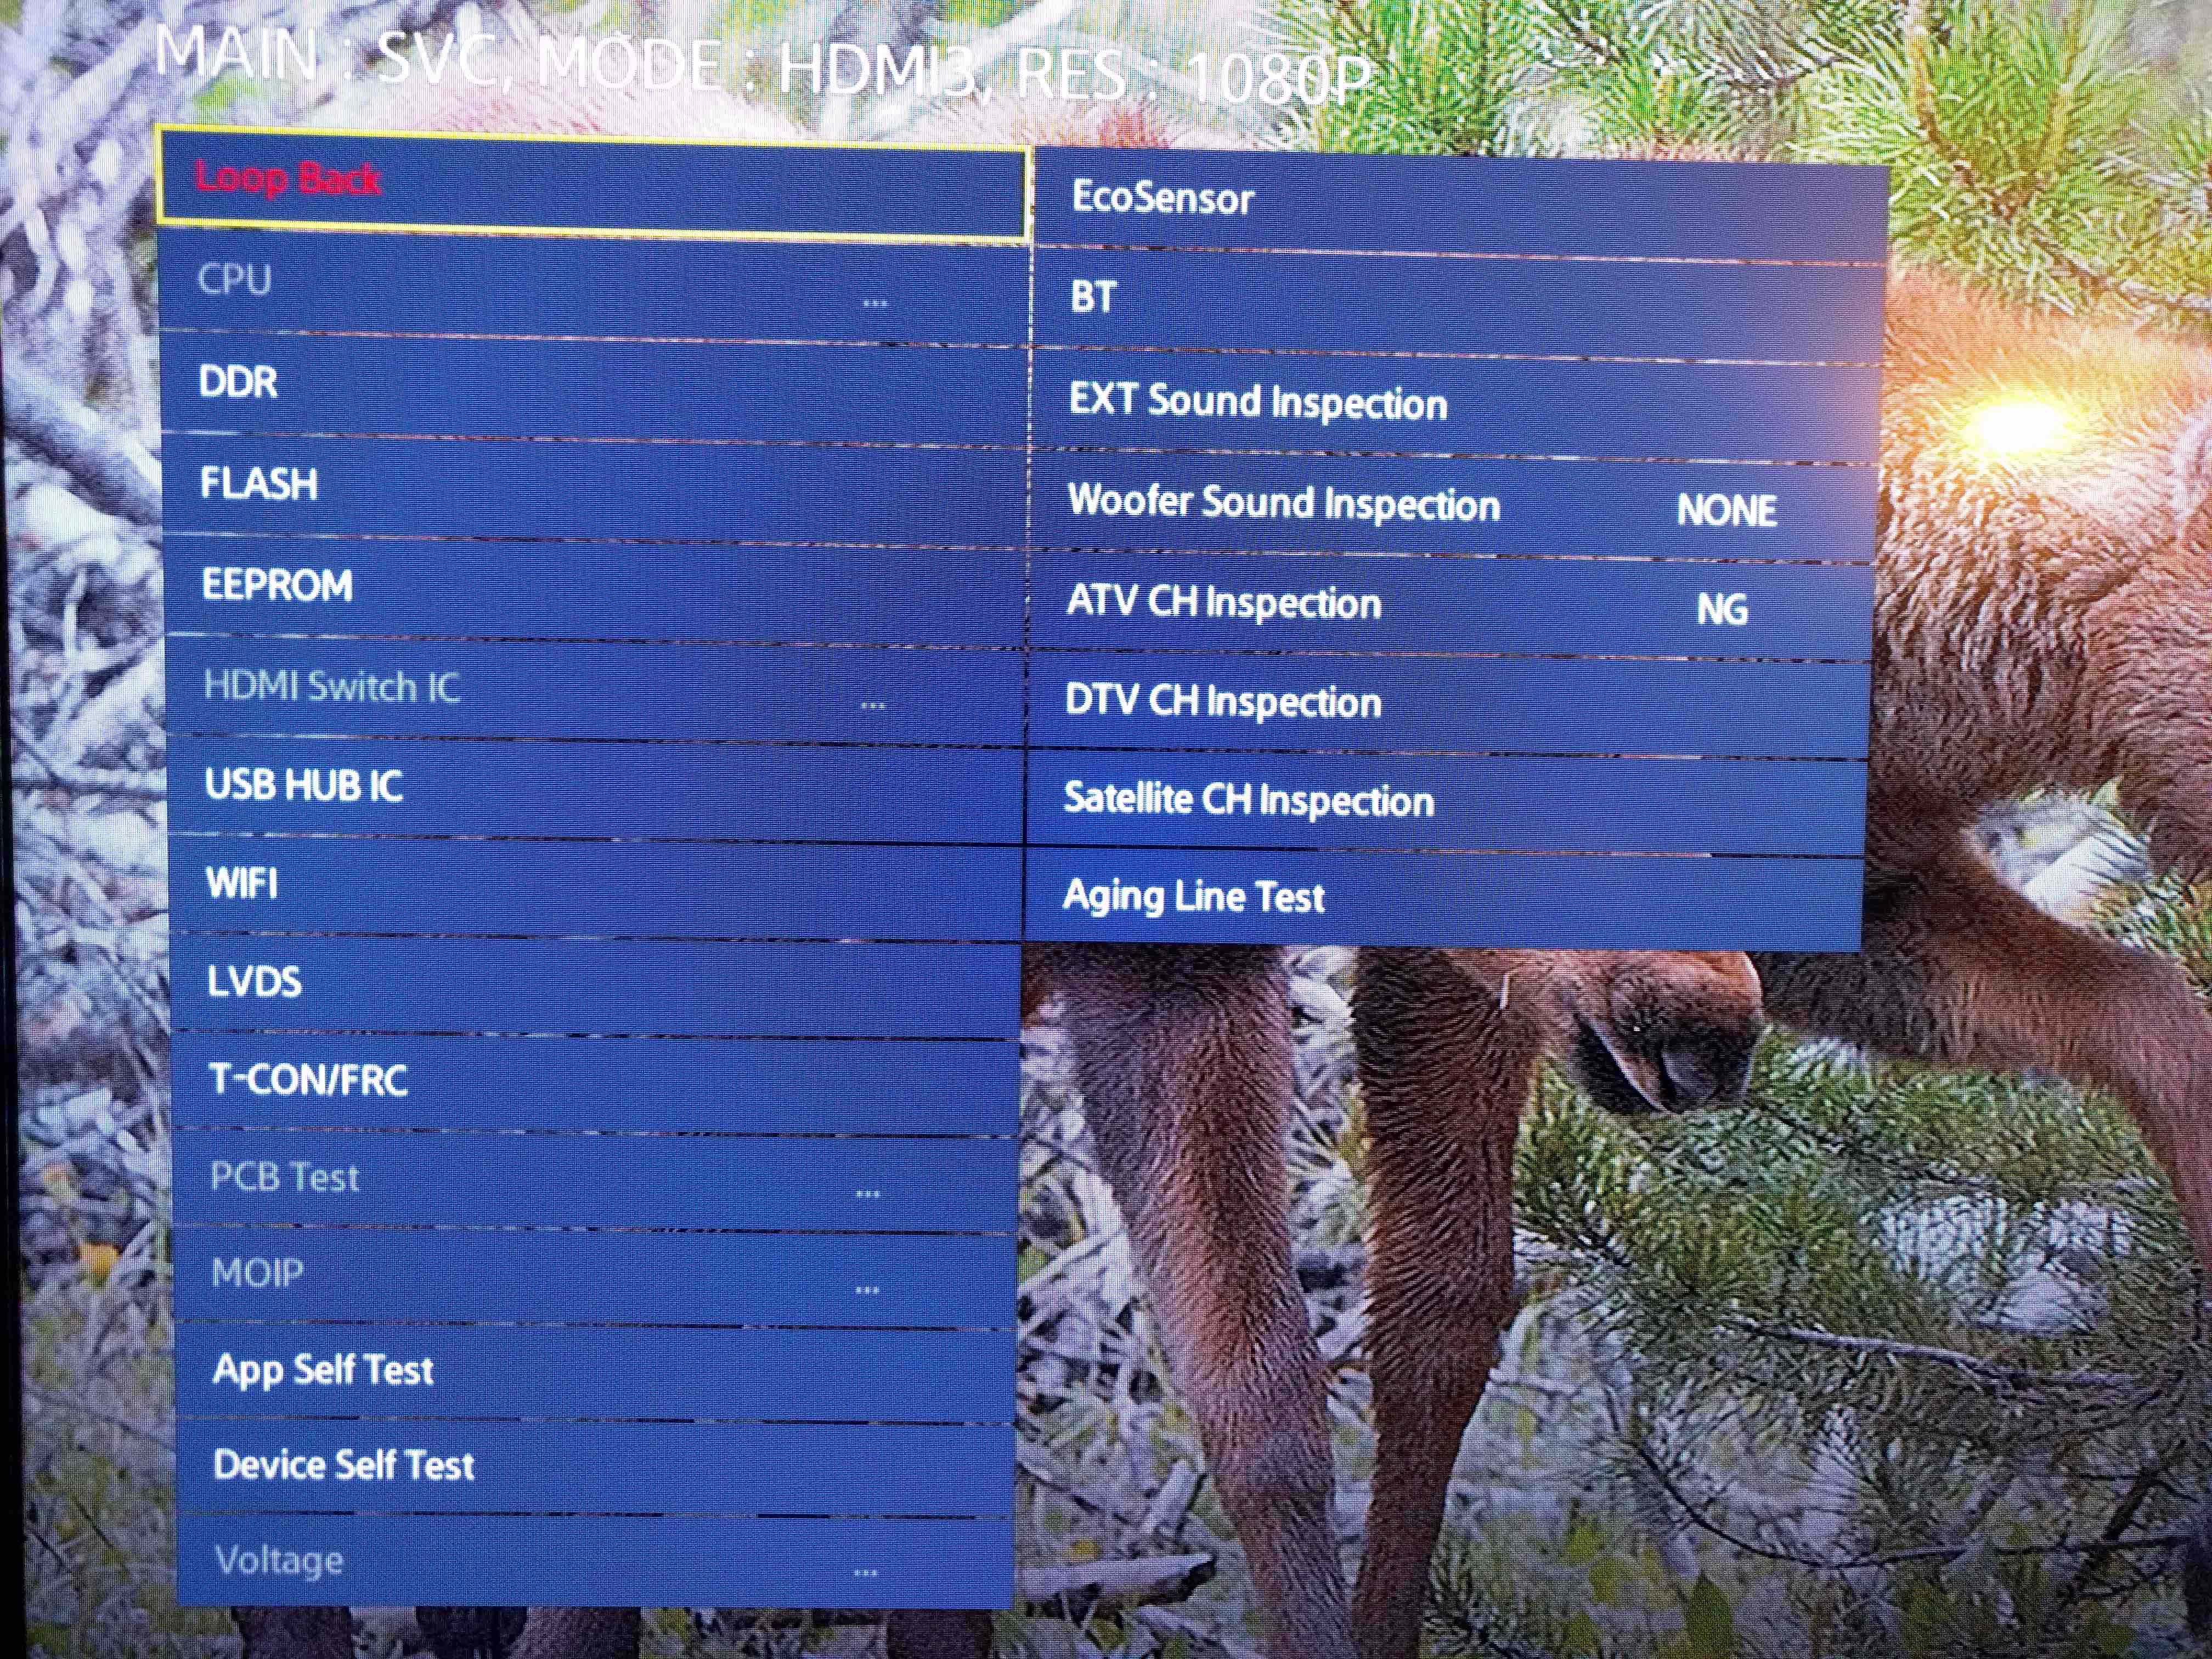

I did the diagnostic tests on the components one by one. When I tested the Wi-Fi module, the result came back as “Fail” and it also caused my TV to freeze again. I left it for a few seconds and then the TV rebooted. So this made it clear that the TV had trouble talking to the Wi-Fi module and that probably caused a Kernel panic which resulted in the reboot. The Samsung Smart TV runs linux kernel 2.6. Even though the TV initially started out with the Wi-Fi problem, because of all other issues I thought the Wi-Fi problem was just a symptom of something big but that wasn’t the case.

To confirm this, I took the TV apart and identified where the Wi-Fi module is located. Then I removed the connector that connects the Wi-Fi module to the motherboard. The problem went away. I couldn’t connect to any Wi-Fi networks but that makes sense. I was able to successfully use my Ethernet connection and stream movies just fine.
I looked up on eBay for the Wi-Fi module’s model number and part number and I was able to find one that costs me $8. I’ve ordered it and it should be here next week. I hope if I replace the Wi-Fi module, I can connect to Wi-Fi networks again.
Update (Jun 15th, 2016)
Today, I received the Wi-Fi module I ordered on eBay and replaced the faulty one I had on my TV and it has been working really well. But the new one only supports 2.4 GHz Wireless networks and not 5 GHz networks even though I bought the one with the same part number. It is not too big of a deal though.
A Simple Sinatra App to Receive Github Webhook Payload
Github notifications are pretty useful in a lot of cases but there are a couple of cases where there are no notifications sent. Examples for this are when someone watches your repository or someone forks it. Yes, these can be seen in your news feed if you watch the repository. But I have a lot of items in the news feed and it is easy to miss things. If I just created a project and want to see how people like it or interested in contributing to it, I would want to know when someone stars it or forks it so I can go check how they use the project or what contributions they want to make.
Initially I had a monitoring script running in one of my servers where it used the Github API to get the watchers and forks count and then sending me an email when someone watches or forks the repository I was interested in. This script was checking the repository status every 5 minutes and seemed unnecessary so I started looking for other options. Github has the option of setting up a webhook and you can specify exactly what events you want to get notified about. That sounded pretty interesting and I was playing with it a little bit. The services like travis-ci and Github pull request builder for Jenkins are using this webhook to get notified about the changes to the repository.
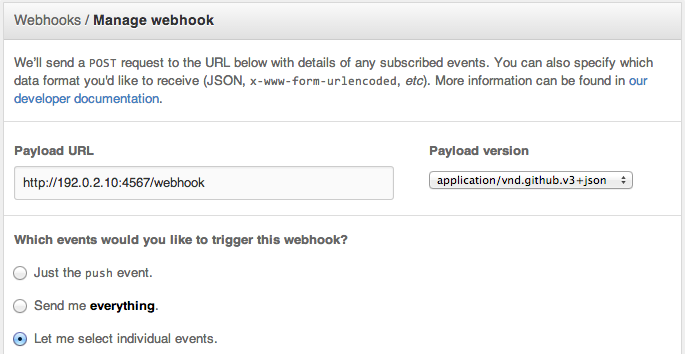
To create a new webhook,
Select particular events
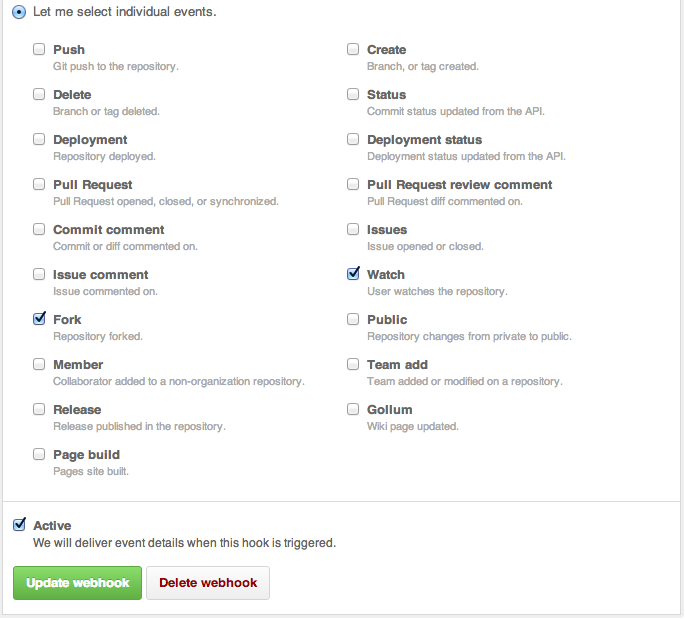
The Github webhook makes a POST to the URL configured in the webhook with the information about what action took place in the repository. The following is the payload sent when someone watches the repository.
1 2 3 4 5 6 7 | |
1 2 3 4 5 6 7 8 9 10 11 12 13 14 15 16 17 18 19 20 21 22 23 24 25 26 27 28 29 30 31 32 33 34 35 36 37 38 39 40 41 42 43 44 45 46 47 48 49 50 51 52 53 54 55 56 57 58 59 60 61 62 63 64 65 66 67 68 69 70 71 72 73 74 75 76 77 78 79 80 81 82 83 84 85 86 87 88 89 90 91 92 93 94 95 96 97 98 99 100 101 102 103 104 105 106 107 108 | |
Here is the simple ruby code written using Sinatra.
1 2 3 4 5 6 7 8 9 10 11 12 13 14 15 16 17 18 19 20 21 22 23 24 25 26 27 28 29 30 31 32 33 34 35 36 37 38 39 40 41 42 43 44 45 46 47 48 49 50 51 52 53 54 55 56 57 58 59 60 61 62 | |
Chef On_failure Handler
Overview
Nobody likes when something fails. When a Chef run fails for some reason, we have to figure out what resource caused the failure and then try to fix it and then re-run it. If we know what might fail, we can try to do some steps and then try the action again. This message sent to the Chef community mailing list proposes something very similar.
Here is an RFC proposed by the Chef community which is still in discussion. It provides a resource specific error handling mechanism. It has many features that will help making an awesome overall Chef experience. If we are aware of something that can fail, why not make the resource try something to fix it by itself?
The Chef Handler provides a way of handling exceptions but that is very limited to just handling exceptions and performing some actions after the failure and be done. I wrote a blog post earlier about how to write custom Chef Handlers.
Proof of Concept
I wrote a simple cookbook called on_failure that monkey patches the way Chef runs the resources and implements this feature. I tried to add as many features as possible but there are still some discussions on how to do certain things. This is just a starting point for trying out how this would work. This cookbook is also published to the community.
In Action
The on_failure cookbook has some additional cookbooks that help trying out this feature. The following are those cookbooks and their purposes:
- sample – Contains some sample recipes for using the
on_failurehandler feature. - meal – Provides a resource called
mealto mimic the example provided in the RFC. - food – Provides a resource called
foodto mimic the example provided in the RFC.
I tried to make all the examples used here to be very similar to the ones proposed in the RFC to make them easier to understand and those examples are also fun to use.
Simple Example
Here is a simple example of how adding this feature to a resource will look like:
1 2 3 4 5 6 7 | |
This recipe doesn’t actually raise any error so there is no use for the on_failure handler in the
meal[breakfast] resource. Let’s simulate a failure and see what the (sample::with_exception) recipe looks like:
1 2 3 4 5 6 7 8 9 10 | |
This recipe will raise a HungryError exception when meal[breakfast] resource first runs. During failure, the
food[bacon] resource’s :eat action will be run and it will make the resource meal[breakfast] to succeed when
it is tried again. See the output in the following Chef run:
1 2 3 4 5 6 7 8 9 10 11 12 13 14 | |
Handling with Retries
By default, only one attempt is made to rerun the resource action. It can be customized by giving the retries
option in the on_failure construct. The resource action will be tried for the specified number of times and the block
given will be executed every time before retrying the resource action.
1 2 3 4 5 6 7 8 9 10 | |
In this example, the meal[breakfast] resource will succeed only if 3 bacon slices are eaten — so it will pass
at the 4th attempt. See the output in the following Chef run:
1 2 3 4 5 6 7 8 9 10 11 12 13 14 15 16 17 18 | |
Handling Multiple Exceptions
Multiple exceptions can be specified in on_failure and it will be caught if any of the exceptions are raised by the
resource.
1 2 3 4 5 6 7 8 9 10 | |
See the output in the following Chef run:
1 2 3 4 5 6 7 8 9 10 11 12 13 14 | |
Using Multiple on_failure Blocks
We may not want to do the same thing for all sorts of failures, so you can specify different on_failure blocks
for different exception types. The blocks will be evaluated in the order they appear in the resource declaration.
1 2 3 4 5 6 7 8 9 10 11 12 13 14 | |
See the output of the following Chef run:
1 2 3 4 5 6 7 8 9 10 11 12 13 14 15 16 | |
It is clear that initially the Chef run failed because the food was not cooked. So it tried to fry the bacon so the food was then cooked but it was cold (what?? just for example) so it tried to microwave the food and hence the Chef run succeeded.
Access to Resource Attributes
The block specified in on_failure can take the resource as an argument so it can access all the resource’s
attributes.
1 2 3 4 5 6 7 8 | |
See the output of the following Chef run:
1 2 3 4 5 6 7 8 9 10 11 12 13 14 15 16 17 18 19 20 21 | |
After the failure occurred, the block given in on_failure got executed which just had a single log line to show
that it had access to the resource’s attributes.
Writing Custom Chef Handlers
Overview
Chef Handler is used to identify situations that may arise during a chef-client run and then instruct the chef-client on how to handle these situations. There are three type of handlers in Chef:
- exception – Exception handler is used to identify situations that have caused the chef-client run to fail. This type of handler can be used to send email notifications about the failure or can take necessary actions to prevent from cascading failure.
- report – Report handler is used when a chef-client run succeeds and reports back on certain details about that chef-client run.
- start – Start handler is used to run events at the beginning of the chef-client run.
In this blog, we will see how to write a custom exception handler to avoid the failure of a chef run to cause big side effects.
Background
When I was working on the rs-storage cookbook, there was a situation where we freeze the filesystem during a backup. I wanted to make sure the filesystem freeze doesn’t give any adverse effects for the applications that may use the filesystem. The sequence of actions we do for taking a backup are: freeze the filesystem, take a backup using the RightScale API, and then unfreeze the filesystem. What if the backup operation fails? Will it leave the filesystem in a frozen state? Definitely yes. We don’t want that to happen. So the filesystem should be unfrozen regardless of whether the backup succeeded or failed.
Solution
To avoid leaving the filesystem from being frozen on a backup failure, I decided to write an exception handler which will unfreeze the filesystem during a backup failure.
The recipe looks like this
1 2 3 4 5 6 7 8 9 10 11 12 13 14 15 16 17 18 19 20 21 22 | |
The filesystem cookbook was
modified to support the freeze and unfreeze actions. The
rightscale_backup provides a resource/provider for
handling backups on a RightScale supported cloud.
This recipe is just that simple. But if the backup resource encountered an error, the chef run will and leave
the filesystem in frozen state. So I wrote a small exception handler that gets run when the chef run fails
and will notify the unfreeze action of the filesystem[data_storage] resource. Here is the handler:
1 2 3 4 5 6 7 8 9 10 11 12 13 14 | |
This handler will simply call the unfreeze action on the filesystem resource when the chef run fails.
Place this handler in the files directory of your cookbook and we will use this later as cookbook_file.
To enable this handler we will use the chef_handler cookbook.
Chef Handler Cookbook
The chef_handler cookbook published by Chef enables the creation and configuration of chef handlers easy. This cookbook creates the handlers directory and provides an LWRP for enabling and disabling specific handlers from within the recipe.
Here is the modified recipe with the use of chef_handler
1 2 3 4 5 6 7 8 9 10 11 12 13 14 15 16 17 18 19 20 21 22 23 24 25 26 27 28 29 30 31 32 33 34 35 36 37 | |
Now if the chef run fails, the filesystem will always be unfrozen.
Further Reading
There is an RFC proposed for chef called on_failure which gives a nice way for handling such exceptions. These on_failure blocks can be given at the resource level instead of the recipe level which is much nicer.
Syntax Highlighting in Vim for Gemfile, Berksfile, and Vagrantfile
The Problem
It all started when I was editing a Vagrantfile and making more customization. It is simply ruby and having syntax highlighting in it will be easier to edit the file. I always see the following line in the Vagrantfile:
1
| |
but it didn’t seem to do anything for the syntax highlighting. I tried to set the filetype for the Vagrantfile when I was in the editor using
1
| |
it worked like a charm. But I don’t want to do it every time I enter the file. Also I have the same problem with the Gemfile as well as the Berksfile.
The Solution
I did some research and figured out that I can achieve this using the autocmd in vimrc. So added the
following lines to my vimrc.
1 2 3 | |
So whenever I open any of these files, they are highlighted as ruby files and I am happy!
Introducing Chef Taste to Taste Your Cookbooks
Chef::Taste – What is it?
Chef Taste is a simple command line utility to check a cookbook’s dependency status. It will list the dependent cookbooks in a tabular format with the version information, status, and the changelog (if possible) for out-of-date cookbooks.
Inspiration
The Gemnasium project does a similar job for checking a Ruby project’s dependencies and keep them up-to-date. Chef-Taste is similar to that instead it provides a simple command line utility to list the dependency status for Chef cookbooks.
What it does?
When you are inside the cookbooks directory, simply type taste to taste the cookbook.
The metadata.rb of the cookbook is parsed to obtain the dependencies. It will display
a table that contains the following rows:
Name– The name of the cookbookRequirement– The version requirement specified in the metadataUsed– The final version used based on the requirement constraintLatest– The latest version available in the community siteStatus– The status of the cookbook: up-to-date (a green tick mark) or out-of-date (a red x mark)Changelog– The changelog of out-of-date cookbooks if available.
The overall status will also be displayed in the bottom of the table.
Changelog
Most of the cookbooks are hosted in Github and are tagged for every release. The changelog is computed by obtaining the source URL provided in the community site and finding the tags being used and the latest tag and displaying a compare view that compares these two tags. This URL is then shortened using goo.gl URL shortener to fit the table.
The details are obtained only for cookbooks available in the community site. Other cookbooks are
displayed but will simply have N/A in their details.
Examples
These examples are based on the cookbooks available in the test/cookbooks directory
in this repository.
1. fried_rice cookbook
1 2 3 4 5 6 7 8 9 10 | |
2. noodles cookbook
1 2 3 4 5 6 7 8 9 | |
3. curry cookbook
1 2 3 4 5 6 7 8 9 10 | |
4. water cookbook
1 2 | |
Issues With Synced Folder on Vagrant
Problem
I use Vagrant for setting up my local development
environments. Recently, I setup an OpenStack
development environment on a vagrant virtual machine using the Devstack
project. I brought up a Ubuntu 12.04 virtual machine using vagrant and checked out the Devstack
code and started stacking. In the initial attempt everything worked fine and I had a working
OpenStack devlopment environment with the up-to-date code from the master branch of all
projects. The source code for all OpenStack projects will be checked out to /opt/stack
directory on the virtual machine. You can simply modify the code on the virtual machine and
restart the appropriate services to see the code change getting reflected. Editing the code
inside a virtual machine using a terminal-based editor can be easier for simple code changes.
But for complex code modification and writing new features, it will good to have a Python IDE.
So I decided to use the synced folder feature
available in vagrant. This feature allows you to share a folder from the host machine to the
virtual machine as an NFS share. So the files from the host machine can be edited directly using
an IDE and the changes can be seen in the virtual machine. Seems pretty simple, right? That’s what
I thought and created a synced folder on my host machine will be mapped to the /opt/stack
directory on the virtual machine. After a few weeks, I set this configuration on my Vagrantfile
and reloaded my virtual machine. Everything went fine but when it tried to install and configure
horizon, it just stuck forever. I thought it was a network issue and restarted the stack.sh a
few times and tried to leave it running overngiht but no luck. Then I
terminated the VM and started it on a fresh virtual machine. At this point, I didn’t know that
the problem was with the synced folder. This issue was going on for a few weeks and I didn’t
take the time to dig deep into the issue to find out the root cause of the problem. While casually
trying to setup the Devstack on another laptop with same configuration and without the synced folder
feature, it worked fine.
Research/Debugging
After I found out that the problem was with the synced folder feature in vagrant, I ssh-ed into the
virtual machine and killed the command that was running on the horizon screen session of stack. The
command was python manage.py syncdb --noinput. Once I killed the process, I got the following
stacktrace.
The Stacktrace
1 2 3 4 5 6 7 8 9 10 11 12 13 14 15 16 17 18 19 20 21 22 23 24 25 26 27 28 29 30 | |
By looking at the most recent function that was called, it was waiting to create a lockfile. This
lockfile creation process requires making a symlink and the call to make the symlink os.link
appeared to be failed and no Timeout was passed into the function (that was bad, the timeout was None).
There was a loop that caught the exception and retried infinetely. Then I tried to execute the same
python command in an interactive python session and got a ‘Operation not permitted’ error. When I tried
to manually link the file using ln command, it seemed to work just fine but for some reason, trying to
do so using python doesn’t work.
The Python Function
1 2 3 4 5 6 7 8 9 10 11 12 13 14 15 16 17 18 19 20 21 22 23 24 25 26 27 28 29 30 31 32 33 | |
Since this is a permission issue, I tried to investigate the file
ownership and permission information. They were owned by the vagrant user who tried to run the stack.
But since this filesystem is a shared filesystem from the host machine using NFS the ownership and
permission on the host machine also comes into account. Since the UID and GID of the vagrant user and
my local username were different, the virtual machien couldn’t properly get access to the filesystem.
That was the root cause!
Solution
The actual solution to fix the permission issue is to match the UID and GID of the vagrant user to the
one on the local uesrname. I didn’t want to mess up my system by changing the UID of my machine.
It might cause some unexpected troubles. I tried to change the UID and GID of the vagrant user on the
virtual machine. It did work but I didn’t go with the solution since recreating the vagrant environment
will again have the same issue and everytime I recreate the development environment, I’ll have to change
the UID and GID of the vagrant user. Also if I change the host machine, the UID and GID will again change.
So I decided not to use the synced folder approach. Instead, I had a copy of the /opt/stack directory
on my host machine and wrote a small script using rsync which will update the code in the virtual machine
using the one on my host machine. Once I make the code change, I’ll have to restart some services to see the
change anyway. So running just another script didn’t seem to be a big deal for me.
Here is the script I used.
Sample Sync Script
1 2 3 4 5 6 7 8 9 10 11 12 13 | |
Note that in the script, I use the --update option. This option makes sure that the new files on the
receiver are unaffected. Only the files locally changed will be updated on the receiver (virtual machine).
For example, there will be new log files in the receiver which we don’t have in the host machine. These
files will be unaffected. I also exclude the ‘stack-volumes-backing-file’. This file is used for backing
the volumes created by cinder. This is usually 5 GB and there is no need for syncing his file. Before
using this script make sure you have your public key available as an authorized key in the virtual machine
so you don’t get prompted for password while running this script.
Apply Google Analytics Tracking to YARD Documentation
Overview
The yard generated documentation does not provide a way to specify the Google Analytics tracking ID in the configuration. If you want to have the tracking ID in the generated documentation, you have to go through all the files and inject the script. Also the files change every time the documentation is generated. I use the yard-generated documentation as the website for my jenkins_api_client project and want to use my Google Analytics tracking ID to see the usage of the project. So I decided to create a rake task that will do this for me
The Rake Task
This simple rake task will go through all html files in the subdirectories of
current directory and inject the google analytics tracking script. Include this
rake task in your Rakefile and replace UA-XXXXXXXX-X with the google
analytics tracking ID of your website.
1 2 3 4 5 6 7 8 9 10 11 12 13 14 15 16 17 18 19 20 21 22 23 24 25 26 27 28 29 30 31 32 33 34 35 36 37 38 39 40 41 42 43 44 45 46 47 | |
The Rake task in action
1
| |
The rake task will go through all
1 2 3 4 5 6 7 8 9 10 11 12 13 14 15 16 17 18 19 20 21 22 23 24 25 26 27 28 29 30 31 32 33 34 35 36 37 38 39 | |
Since this is newly generated documentation, the file has to go through all files inject the google analytics script in all of them. If the file already has the analytics script, that file will be skipped. A generated page using this rake task can be found in the jenkins_api_client project documentation here.
Customizing Pry and IRB Sessions
The .irbrc file
The .irbrc file is usually placed in your home directory (~/.irbc). This
file is just a regular ruby file and you can write any arbitrary ruby code that
you want to be executed before the IRB session is loaded.
The .pryrc file
The .pryrc file is very similar to the .irbrc file and is placed in your
home directory (~/.pryrc) and this file is loaded before the Pry session is
started.
Customizing the session
If you use a particular gem every time you are in an IRB or a Pry session, you
can simply include that in your .irbrc or .pryrc file so you do not have to
manually require that gem every time you enter the session. An example for this
would be the pretty print (pp) library. Just add the require statement in the
rc file and that will load this library whenever you enter the session.
1
| |
Note: The following customizations are IRB specific and Pry has most of them in-built.
If you use IRB instead of Pry, you will have to install some additional gems to
get the coloring enabled in the output. Pry has this in-built so you do not
have to do any additional work. To enable coloring in IRB, the wirble gem
should be installed. The following simple configuration will enable coloring
using the wirble gem.
1 2 3 4 5 6 7 | |
Tab completion in IRB can be enabled by
1
| |
Automatic indentation can be set by
1
| |
If you would like to save the history between IRB sessions, it can be achieved by
1 2 3 4 5 6 | |
Per-project customization
The .[irb|pry]rc file can be customized to automatically load the environment
for your project based on your current working directory.
Whenever I work with Ruby projects, I keep a separate window open for my pry
session. I do not want to load and initialize the project every time I enter te
session. I usually have the credentials saved separately in a YAML file. So in
the .pryrc file, I get the current working directory and based on the
directory, I load and initialize my project. The object I initialize in the rc
file will be available inside the irb/pry session, which I can then use for my
interactions.
1 2 3 4 5 6 7 8 9 10 11 12 13 14 15 16 17 18 19 20 21 22 23 24 25 26 | |
Now that I have my rc file setup to prepare my project when I am in my jenkins_api_client project directory, when I enter the Pry session, my project is loaded and ready for me to play with. If I change my directory to a different project and enter irb/pry session again, that project will be loaded instead.
1 2 3 4 | |
It is as simple as adding another condition to match your project and name do the initializations to load your project. The above method will work even if you are deep inside your project directory structure as the regex we use to match th current directory uses non-greedy approach.
Pry as an Alternative to IRB
What is Pry?
Pry is a feature-rich alternative to the standard IRB (Interactive Ruby Shell) which provides tons of features including syntax highlighting, source code browsing, documentation browsing, dynamic code reloading, live editing of code and much more. More information about Pry can be found in their website. In this post I am going to describe how I use Pry for building and debugging my projects with examples as screenshots.
Features
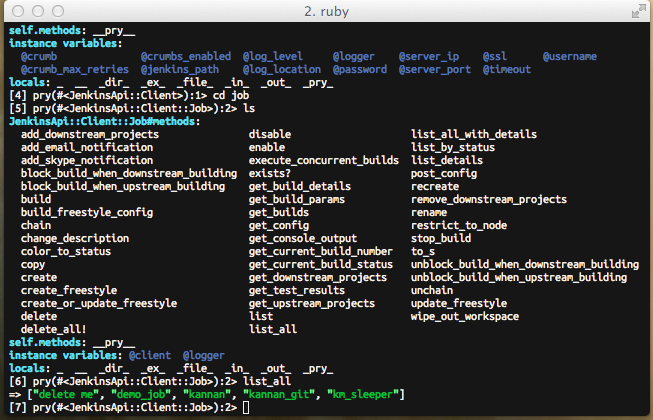
Methods cd and ls
Once you are in the Pry session, you can change your scope to any Object you
want. During the development of my project
jenkins_api_client I often
use interactive Pry session to debug the code. Please take a quick look at my
project for easier understanding of the examples here. My .pryrc initializes
my project by setting up the credentials.

The @client instance variable is an object to the Client class. For example,
if I want to list all jobs available in jenkins, I have to access that using
@client.job.list_all. The @client object has a method called job which
will initialize the Job class and return an object which can then be used
for calling methods on the Job class. With the use of Pry, you can easily
change the scope so you do not have to use the chain of objects.
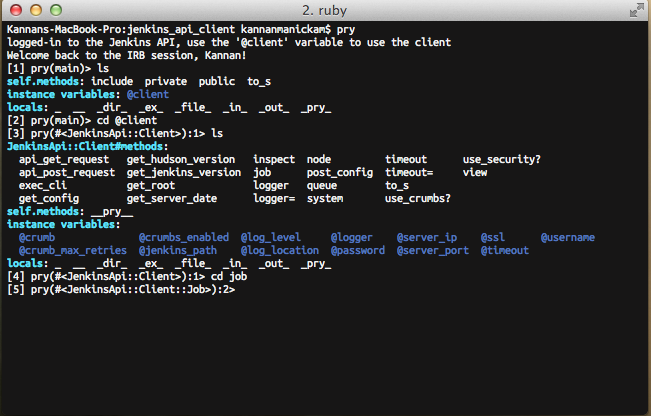
The cd command (just like changing the directory in Unix systems) can be used
to change the scope into the object specified as the argument. The ls command
can be used to list (just like listing files in Unix systems) all resources
available in current scope. If you want just the methods just do ls -m.
Now that we have changed the scope to the job object, we can call the methods
on that object by simply calling the method by the method name.
Methods show-method and show-doc
The show-method can be used for displaying the method. Similarly, the
show-doc method can be used for displaying the documentation of the given
method.
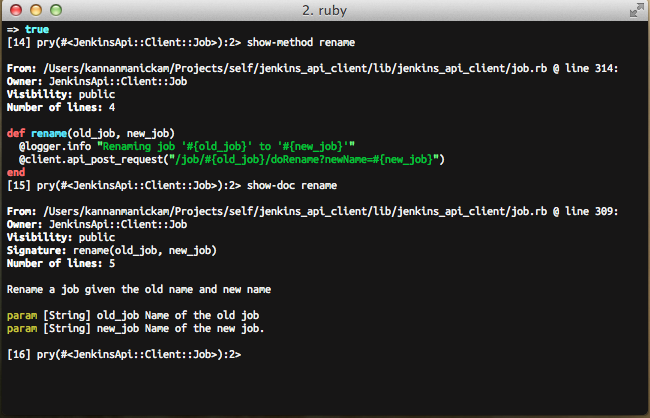
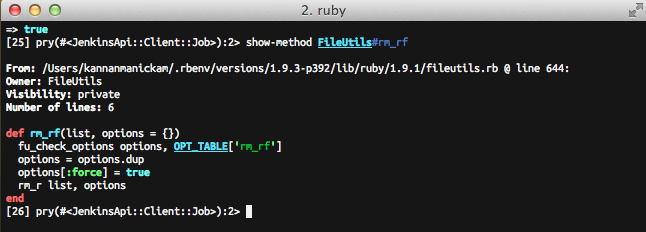
The show-method can also be used for system methods. For example, the rm_rf
method in the FileUtils class can be viewed simply by calling show-method
FileUtils#rm_rf.
Editing of methods and live reload of code
If you are working on a method and want to edit and see the behavior for the
change, you can simly use the edit method and specify the method name. It
will open your default editor. Since I have my default editor set to vim,
this example opens up vim in the shell itself.

In the following screenshot, you can see that the editor is opened and the cursor is pointing to the correct method.

Once the the edit is completed and the file is saved, the editor is closed and you will be returned to the Pry session. As Pry automatically reloads code for the class the method resides, if you execute the method again, the code changes will be reflected.
Note: Do not wonder why there is a red line at the 80 character mark. I
follow the ruby style guide of limiting character width to 80 characters. I use
the colorcolumn feature in Vim.
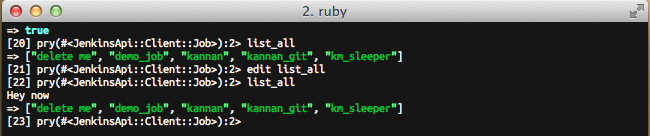
Bingo! The code change can be seen clearly.
These examples are just a few that are used for development and debugging. It provides much more functionality. Check out more examples and screencasts on pryrepl.org